三、应用指南
3.1 概述
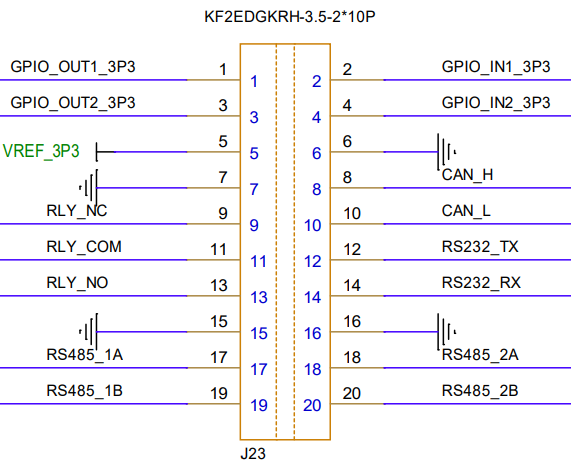
MES20 板载通过 J23 端子对外提供电源、GPIO、CAN、RS232、RS485、继电器触点等信号,全部信号均为 3.3 V 逻辑电平。
| 类别 | 信号/功能说明 | 引脚范围 | 备注 |
|---|---|---|---|
| 电源 | 3.3V、GND | 3, 5, 6, 7, 9, 10, 16, 20 | 含参考电压 VREF_3P3 |
| GPIO | 4组可编程 IO(输入/输出,3.3V 电平) | 1, 2, 4, 6 | 含 OUTx/INx 标识 |
| CAN 总线 | 1路 CAN2.0B(H/L) | 8, 9 | 带隔离,可直接接入总线 |
| 继电器 | 1组常开/常闭触点 | 11, 12, 13 | RLY_COM、RLY_NO、RLY_NC |
| RS232 | 1路全双工串口(TX/RX) | 11, 13 | 经 SP3232 电平转换 |
| RS485 | 2路半双工 RS485(A/B) | 15-18, 19-20 | 独立总线,支持冗余或级联 |
3.1.2 电源信号
| Pin | Signal Name | Function | Voltage |
|---|---|---|---|
| 5 | VREF_3P3 | 3.3V power supply | 3.3V |
3.1.3 GPIO 信号
| Pin | Signal Name | Function | Default State | Electrical Type |
|---|---|---|---|---|
| 1 | GPIO_OUT1_3P3 | General - purpose I/O | output | I/O |
| 2 | GPIO_IN1_3P3 | General - purpose I/O | Input | I/O |
| 3 | GPIO_OUT2_3P3 | General - purpose I/O | output | I/O |
| 4 | GPIO_OUT2_3P3 | General - purpose I/O | output | I/O |
3.1.4 CAN 总线
| Pin | Signal Name | Function | Electrical Specs |
|---|---|---|---|
| 7 | CAN_h | CAN 差分 H | 内部已接 120 Ω 终端 |
| 8 | CAN_L | CAN 差分 L | 内部已接 120 Ω 终端 |
3.1.5 RS232 接口
| Pin | Signal | Function | 方向(DTE 视角) | 实际 TTL 源 |
|---|---|---|---|---|
| 11 | RS232_TX | 发送数据 | 输出 | UART5_TXD |
| 13 | RS232_RX | 接收数据 | 输入 | UART5_RXD |
3.1.6 RS485 接口
| Pin | Signal | Function | 方向 | 备注 |
|---|---|---|---|---|
| 15 | RS485_1A | 差分 A | I/O | 总线 1 |
| 17 | RS485_1B | 差分 B | I/O | 总线 1 |
| 18 | RS485_2A | 差分 A | I/O | 总线 2 |
| 19 | RS485_2B | 差分 B | I/O | 总线 2 |
| 12 | RLY_NO | 继电器常开触点 | - | 详见 3.8 节 |
| 20 | RLY_COM | 继电器公共端 | - | 最大 2 A 30 V |
3.2 RS485 使用
板载通过 MAX348半双工收发器,将 UART5 转换为 RS485 差分总线,并引出两路独立总线(RS485_1、RS485_2),方便冗余或级联。
示例代码:
def rs485_interconnect_test(self, send_port, recv_port, baudrate=9600, test_data="RS485 Interconnect Test"):
    print("\n===== Starting RS485 Interconnect Test =====")
    sender = SerialTester()
    if not sender.open_port(send_port, baudrate=baudrate):
        return False

    receiver = SerialTester()
    if not receiver.open_port(recv_port, baudrate=baudrate):
        sender.close_port()
        return False

    success = 0
    print(f"Test data: {test_data}")
    print(f"Sending port: {send_port}, Receiving port: {recv_port}")

    try:
        send_data = f"{test_data}"
        sender.send_data(send_data)
        time.sleep(0.5)
        received = receiver.receive_data()

        if received and received.decode('ascii', errors='replace') == send_data:
            print(f"Test: Success")
            success = 1
        else:
            print(f"Test: Failed")
    except Exception as e:
        print(f"Test: Error - {str(e)}")

    print(f"\n===== RS485 Interconnect Test Result =====")
    print(f"Total tests: 1, Success: {success}, Failed: {1-success}")
    sender.close_port()
    receiver.close_port()
    return success == 1
函数说明:
-
分别实例化两个 SerialTester 对象,控制“发送”与“接收”两个端口
-
通过 export+direction 把 GPIOS_22 设为输出,高→发、低→收
-
发送完成后等待 0.5 s,再切回接收模式,避免帧尾截断
-
比较收发内容,返回 True/False
3.3 RS232 使用
板载通过 SP3232 将 UART5 的 TTL 信号转换为 RS232 电平(±5 V 左右),并引到 J23 端子。用跳线短接板端 J23-11 (RS232_TX) 与 J23-13 (RS232_RX),即可形成自发自收通道。
示例代码:
def rs232_loopback_test(self, port, baudrate=9600, test_data="RS232 Loopback Test"):
    print("\n===== Starting RS232 Loopback Test =====")
    if not self.open_port(port, baudrate=baudrate):
        return False

    success = 0
    print(f"Test data: {test_data}")

    try:
        send_data = f"{test_data}"
        self.send_data(send_data)
        time.sleep(0.2)
        received = self.receive_data()

        if received and received.decode('ascii', errors='replace') == send_data:
            print(f"Test: Success")
            success = 1
        else:
            print(f"Test: Failed")
    except Exception as e:
        print(f"Test: Error - {str(e)}")

    print(f"\n===== RS232 Loopback Test Result =====")
    print(f"Total tests: 1, Success: {success}, Failed: {1-success}")
    self.close_port()
    return success == 1
函数说明:
-
open_port() 打开指定串口并设置波特率
-
send_data() 将字符串以 ASCII 形式发出
-
receive_data() 非阻塞接收,超时 1 s
-
比较收发内容,返回 True/False
3.4 GPIO 使用
芯片支持三组 GPIO ,分别命名为 SAP GPIO,CPU GPIO 和 RTC GPIO。在每个 GPIO 组内对信号从 0 开始编址,称为物理编号,此外,软件还对全部 GPIO 信号做了统一编址,称为逻辑编号,其编号规则是
GPIO 逻辑编号 = GPIO 所属组 BASE 号 + 组内物理编号
GPIO 控制功能的具体示例代码:
def gpio_test():
    print("\n===== Starting GPIO Manual Control Test =====")

    domain = input("Please enter GPIO domain (cpu/rtc/sap): ").lower()
    if domain not in ['cpu', 'rtc', 'sap']:
        print("Error: Invalid domain. Must be 'cpu', 'rtc', or 'sap'")
        return

    domain_offset = 200 if domain == 'cpu' else 400 if domain == 'rtc' else 0

    try:
        base_num = int(input(f"Please enter base GPIO number (domain {domain}): "))
        gpio_num = base_num + domain_offset

    except ValueError:
        print("Error: GPIO number must be an integer")
        return

    gpio_path = f"/sys/class/gpio/gpio{gpio_num}"
    value_path = f"{gpio_path}/value"

    try:
        if not os.path.exists(gpio_path):
            with open("/sys/class/gpio/export", "w") as f:
                f.write(str(gpio_num))
            time.sleep(0.1)

        with open(f"{gpio_path}/direction", "w") as f:
            f.write("out")
        time.sleep(0.1)

        print("\nGPIO manual control mode:")
        print("Commands: '1' to set high, '0' to set low, 'q' to quit")

        while True:
            cmd = input("Enter command (1/0/q): ").strip().lower()
            if cmd == 'q':
                print("Exiting GPIO control")
                break
            elif cmd in ['0', '1']:
                with open(value_path, "w") as f:
                    f.write(cmd)
                time.sleep(0.1)

                with open(value_path, "r") as f:
                    read_val = f.read().strip()
                print(f"GPIO{gpio_num} set to {cmd}, verified value: {read_val}")
            else:
                print("Invalid command. Please enter '1', '0', or 'q'")

        print("\n===== GPIO Test Completed =====")
        return True

    except PermissionError:
        print("Error: Permission denied. Please run with root privileges (sudo)")
        return False
    except Exception as e:
        print(f"GPIO test failed: {str(e)}")
        return False
    finally:
        pass
3.5 RELAY
RELAY 是一个用于控制继电器的模块。该功能通过操作指定的GPIO引脚来控制继电器的吸合(ON)与释放(OFF)状态,并检测实际操作是否成功,适用于验证继电器硬件及控制链路的完整性。
工作原理:
- 配置GPIO引脚为输出模式
- 控制GPIO输出高电平,使继电器吸合(ON状态)
- 控制GPIO输出低电平,使继电器释放(OFF状态)
下面是继电器测试的核心函数,实现了GPIO配置、继电器控制和状态检测的完整流程
def relay_test():
    print("\n===== Starting Relay Test =====")
    gpio_num = 276  # 默认控制继电器的GPIO编号
    gpio_path = f"/sys/class/gpio/gpio{gpio_num}"
    value_path = f"{gpio_path}/value"

    try:
        # 导出GPIO(若未导出)
        if not os.path.exists(gpio_path):
            print(f"Exporting GPIO{gpio_num}...")
            with open("/sys/class/gpio/export", "w") as f:
                f.write(str(gpio_num))
            time.sleep(0.1)

        # 配置GPIO为输出模式
        print(f"Setting GPIO{gpio_num} as output...")
        with open(f"{gpio_path}/direction", "w") as f:
            f.write("out")
        time.sleep(0.1)

        # 测试继电器吸合(ON状态)
        print("\nTesting relay ON (set value 1)...")
        with open(value_path, "w") as f:
            f.write("1")
        time.sleep(1)  # 等待状态稳定

        # 验证ON状态
        with open(value_path, "r") as f:
            val = f.read().strip()
        if val != "1":
            print(f"Relay ON test failed: Expected 1, got {val}")
            return False
        print("Relay ON test: Success")

        # 测试继电器释放(OFF状态)
        print("\nTesting relay OFF (set value 0)...")
        with open(value_path, "w") as f:
            f.write("0")
        time.sleep(1)  # 等待状态稳定

        # 验证OFF状态
        with open(value_path, "r") as f:
            val = f.read().strip()
        if val != "0":
            print(f"Relay OFF test failed: Expected 0, got {val}")
            return False
        print("Relay OFF test: Success")

        # 输出测试结果
        print("\n===== Relay Test Result =====")
        print("All relay tests passed")
        return True

    except PermissionError:
        print("Error: Permission denied. Please run with root privileges (sudo)")
        return False
    except Exception as e:
        print(f"Relay test failed: {str(e)}")
        return False
3.6 CAN总线
CAN总线是一种用于数据传输的异步通信协议,它使用双工的通信方式,允许多个设备之间进行数据传输。
测试代码封装了CAN总线测试的逻辑,具体实现如下:
- 通过 ip link 完成指定接口的波特率设置与启用
def _setup_can_interface(self, ifname, bitrate=1000000):
    try:
        subprocess.run(f"ip link set {ifname} down", shell=True, check=True, stdout=subprocess.DEVNULL, stderr=subprocess.DEVNULL)
        subprocess.run(f"ip link set {ifname} type can bitrate {bitrate}", shell=True, check=True, stdout=subprocess.DEVNULL, stderr=subprocess.DEVNULL)
        subprocess.run(f"ip link set {ifname} up", shell=True, check=True, stdout=subprocess.DEVNULL, stderr=subprocess.DEVNULL)
        time.sleep(1)
        return True
    except subprocess.CalledProcessError:
        print(f"Interface configuration failed: Please check interface name and permissions")
        return False
- 通过 socket 创建 CAN套接字并绑定到指定接口
def open_can_socket(self, ifname):
    self.sockfd = self.libc.socket(PF_CAN, SOCK_RAW, CAN_RAW)
    if self.sockfd < 0:
        print(f"Socket creation failed, error code: {ctypes.get_errno()}")
        return False

    print(f"CAN socket created successfully, file descriptor: {self.sockfd}")

    if_index = self.libc.if_nametoindex(ifname.encode('utf-8'))
    if if_index == 0:
        print(f"Failed to get interface index, error code: {ctypes.get_errno()}")
        self.close_can_socket()
        return False

    addr = sockaddr_can()
    addr.can_family = PF_CAN
    addr.can_ifindex = if_index

    ret = self.libc.bind(self.sockfd, ctypes.byref(addr), ctypes.sizeof(addr))
    if ret < 0:
        print(f"Socket binding failed, error code: {ctypes.get_errno()}")
        self.close_can_socket()
        return False

    return True
- 通过 sendto 发送 CAN帧
def send_can_message(self, can_id, data):
    if self.sockfd < 0:
        print("Socket not initialized")
        return False

    frame = can_frame()
    frame.can_id = can_id & 0x7FF
    frame.can_dlc = min(len(data), 8)

    for i in range(frame.can_dlc):
        frame.data[i] = data[i] if i < len(data) else 0

    ret = self.libc.sendto(
        self.sockfd,
        ctypes.byref(frame),
        ctypes.sizeof(frame),
        0,
        None,
        0
    )

    if ret <= 0:
        print(f"Transmission failed, error code: {ctypes.get_errno()}")
        return False

    print(f"Transmission successful: ID=0x{frame.can_id:x}, DLC={frame.can_dlc}, Data=", end="")
    for i in range(frame.can_dlc):
        print(f"{frame.data[i]:02x} ", end="")
    print()
    return True
- 通过 recvfrom 接收 CAN帧
def receive_can_message(self, timeout=10):
    if self.sockfd < 0:
        print("Socket not initialized")
        return None

    # Set up buffer for received frame
    frame = can_frame()

    # Use select to implement timeout
    try:
        import select
        ready, _, _ = select.select([self.sockfd], [], [], timeout)
        if not ready:
            print("Reception timed out")
            return None
    except ImportError:
        # If select is not available, proceed without timeout
        pass

    # Receive frame
    ret = self.libc.recvfrom(
        self.sockfd,
        ctypes.byref(frame),
        ctypes.sizeof(frame),
        0,
        None,
        None
    )

    if ret <= 0:
        print(f"Reception failed, error code: {ctypes.get_errno()}")
        return None

    # Extract data
    data = []
    for i in range(frame.can_dlc):
        data.append(frame.data[i])

    print(f"Reception successful: ID=0x{frame.can_id:x}, DLC={frame.can_dlc}, Data=", end="")
    for byte in data:
        print(f"{byte:02x} ", end="")
    print()

    return {
        'id': frame.can_id,
        'dlc': frame.can_dlc,
        'data': data
    }